|
Work with step branch relationship |
  
|
| Show/Hide Hidden Text |
|
Work with step branch relationship |
|
| Show/Hide Hidden Text |
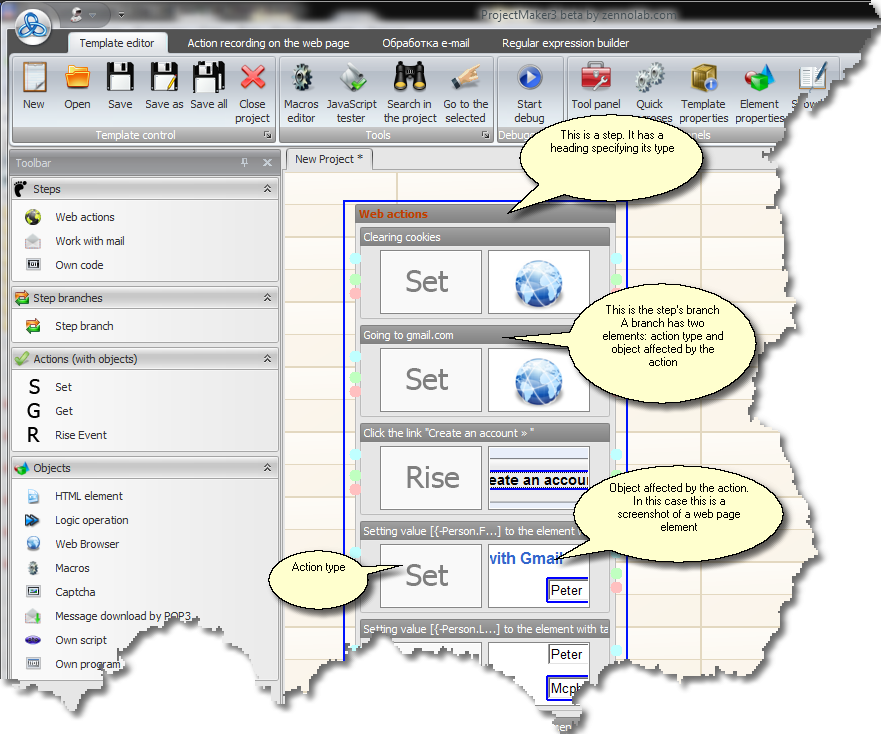
The template you copied to the Template Editor consists of one or several steps.
A step is a unification of several actions (branches).
A step can be of three types:
• Web action
• E-mail job
• Your own code
This is dependant on what the subject matter is it will be working with.
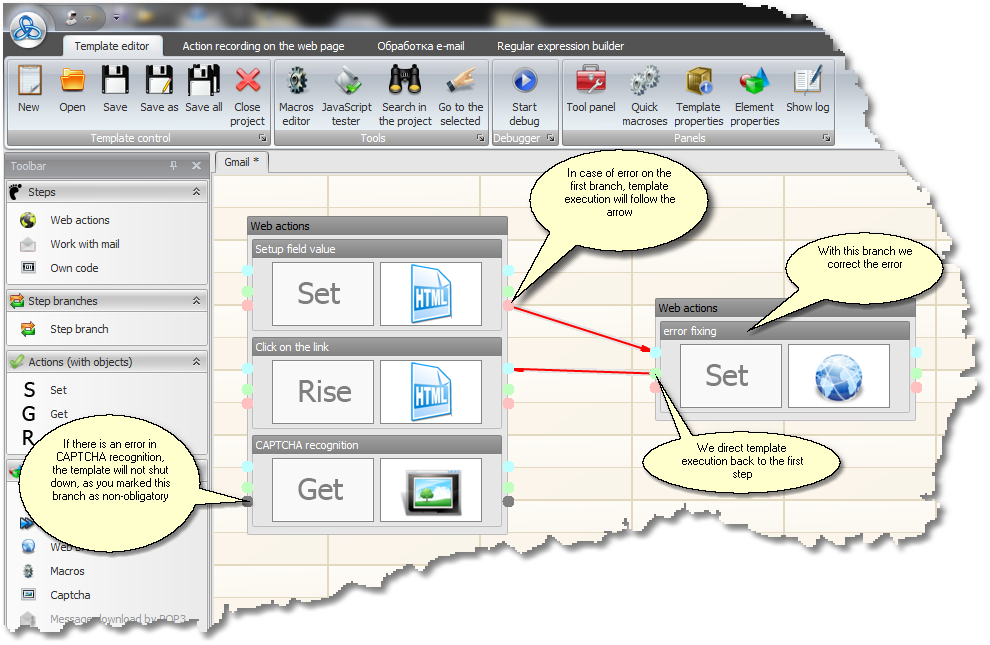
The essence of this scheme is the following: when a template is executed, the steps that are executed one after another (from first to last), inside these steps its branches that are executed in subsequent order. Each branch is an action, e.g. cleaning cookie (?), setting a field in the form, activating events on the web page, recognizing CAPTCHA, etc. (Transitions between branches and steps can be inconsecutive as well, e.g. registration validation where the logic operation branch analyses text on the web page and depending on the text content may switch further work in different directions).
Step branches consist of two parts: action type and the object affected by this action.
Actions can be of three types:
• Set
• Get
• Rise Event
Objects are more numerous:
• Web Browser
• HTML element
• CAPTCHA
• Macros
• Logic operation
• E-mail uploading through POP3
• Your own script
• Your own program
For example, in order to set a field name in a form on a web page you should use the Set--HTML element command and contrariwise, to get a field name you should use the Get--HTML element command.
Usually most of steps and branches are created automatically, but there are cases when branches have to be added manually, e.g. to save the obtained result.
To add a step take and drag it from the Tool Panel to the editor field. To add branches inside a step you can use the same drag and drop function. The same method is also used to define type of action and the object
By right clicking on a branch or a step you can delete, cut, copy or paste a step or a branch. You can perform these actions between two different projects and not just inside one and the same project. To delete several branches press Ctrl and holding it open the menu and choose the required action.
Each branch has three points at its sides. This is entrance (blue point), exit in case of successful branch processing (green point) and exit in case of error in branch processing (red point). Branches can be joined one with another. For this double click on the exit point (red or green) using the left mouse button and then do the same with the entrance point (blue) of the branch to which you want to redirect the action. A red arrow will appear showing a link between the branches.
Hence, in case of faulty branch action (the right element was not found, you failed to click on the link, etc.) you can take some additional actions to remedy the situation. To delete the link between branches you should right click on it and in the menu that pops up choose 'delete the link'. If you double click with the right mouse button on the red point it will turn gray. This means that should a fault occur on this branch it will be ignored and the work will continue. If the red point has no exit to other branches then in case of fault occurrence the template will have a runtime error and the work will be aborted.