|
Web Page Analysis |
  
|
| Show/Hide Hidden Text |
|
Web Page Analysis |
|
| Show/Hide Hidden Text |
Quite often to conceive a regular expression you have to look through the text of an HTML page.
At template recording you can encounter various obstacles, errors or simply firewalls of different kinds. These problems cannot always be solved automatically. This is where analysis of a web page and its elements can come in handy.
For this ZennoPoster has several useful tools in the ProjectMaker, in the template recording tab.
Viewing web page text
To conceive regular expressions when parsing data on a web page you need to have access to its text.
There are three types of web page text that you can use:
• Source page text
• DOM text
• Page text (as viewed by the user)
To find out the difference between the three read the Success Validation section.
To use this text just press the 'Page Text' button when recording a template. This window will open:
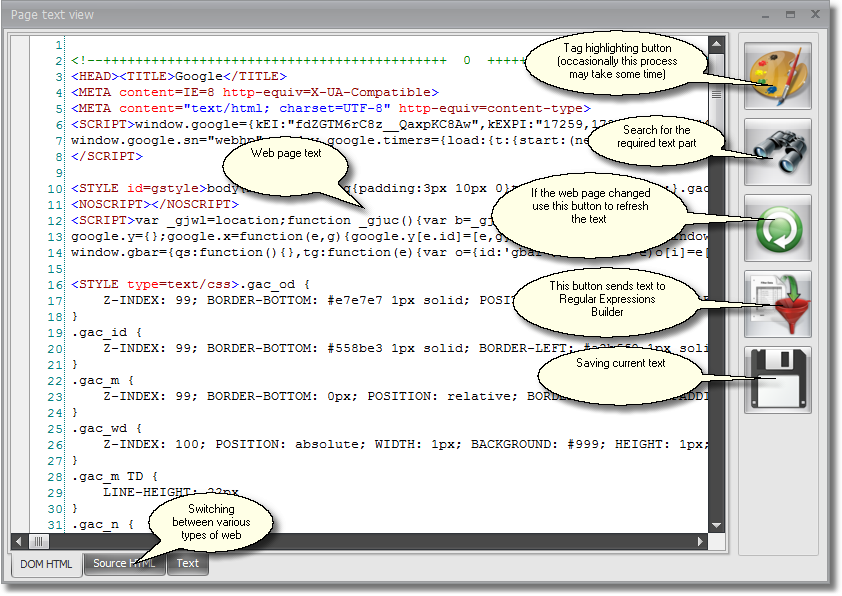
In this window at the bottom you will see tabs with various text types. To the right there is a button, by pressing which you will copy the current text into the Regular Expressions Builder. There you can conceive the regular expression for the text type you need.
Analyzing structure of web page elements
In order to be able to see what are the elements of the web page and how they are positioned on it you should use the 'Elements Tree' panel:
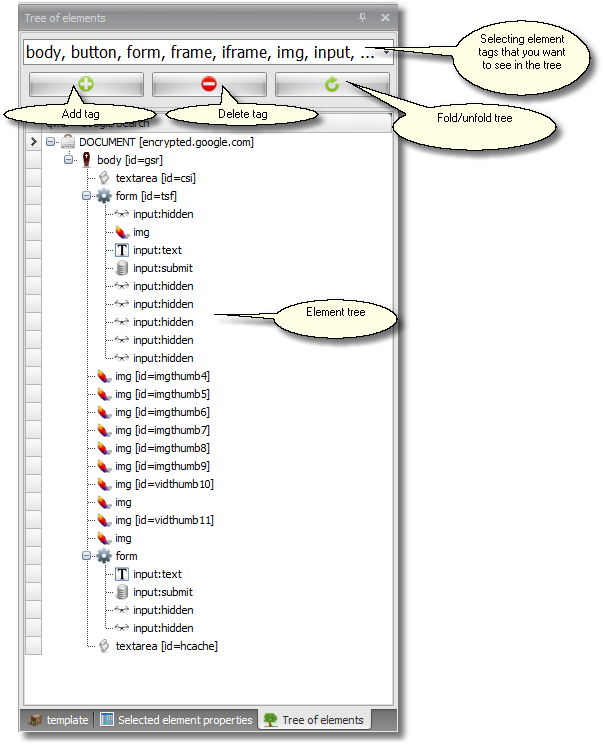
At the top of this panel there is a dropdown list in which you can select tags based on which the elements tree will be built (non-selected elements with tags will not participate in the tree's construction). If you cannot see the tags you need in the dropdown list you can add them using the button with a "+" sign (now you can easily guess what the "-" marked button is there for :) ).
The third button is used to open/close the elements tree.
At a click on an element in the tree a blue frame (highlighting) appears around this element. This is how you can see which elements are placed where on the web page. If the element is outside the current page view frame the page will scroll up/down to reveal the captured element. The element will not get highlighted at all if this element is not reflected at all on the web page (it can be a script or an input of the hidden type).
! If you highlight an element and then right click on it a pop-up menu will appear similar to the one that pops-up when you click on a highlighted element in the browser window. In this menu you can select element control and send it to the Branch Builder to test all possible manipulations with this element.
Highlighted element properties
You have certainly noticed that when recording a template the element of a web page over which the cursor is placed gets highlighted with a blue frame. In the control panel at the top you can set the following three highlighting modes:
• highlight all;
• highlight only key elements;
• no highlight.
Key elements are considered those that can be modified, buttons, links and WYSIWYG editors.
You can work with a highlighted element through a pop-up menu activated by right clicking on the element. This menu will allow you to set up the filling-in of the modified element or to record activation of a DOM-model event (e.g. onclick, onkeydown). You can see main properties of the highlighted element in the 'Highlighted Element Properties' panel:
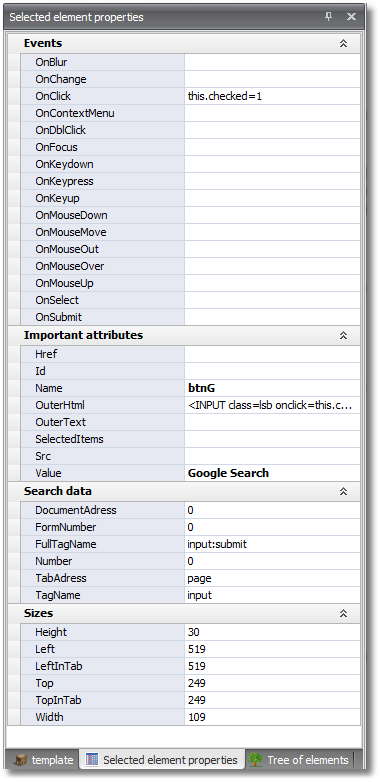
You can work simultaneously with the elements tree panel and the highlighted element properties panel. This is especially helpful when you need to see properties of an element that are not reflected on the web page or are covered by other elements and thus cannot be highlighted by simple positioning of the cursor upon it.